


BARBARIAN
The Throwing Barbarian pops off really early and stays a solid option all the way into the late levels.
This guide will walk you through the key steps to take along the way!
“I heard you like throwing stuff!”

Cycle through the images using the arrows for various setups depending on your playstyle preferences
STARTING ABILITY SCORES
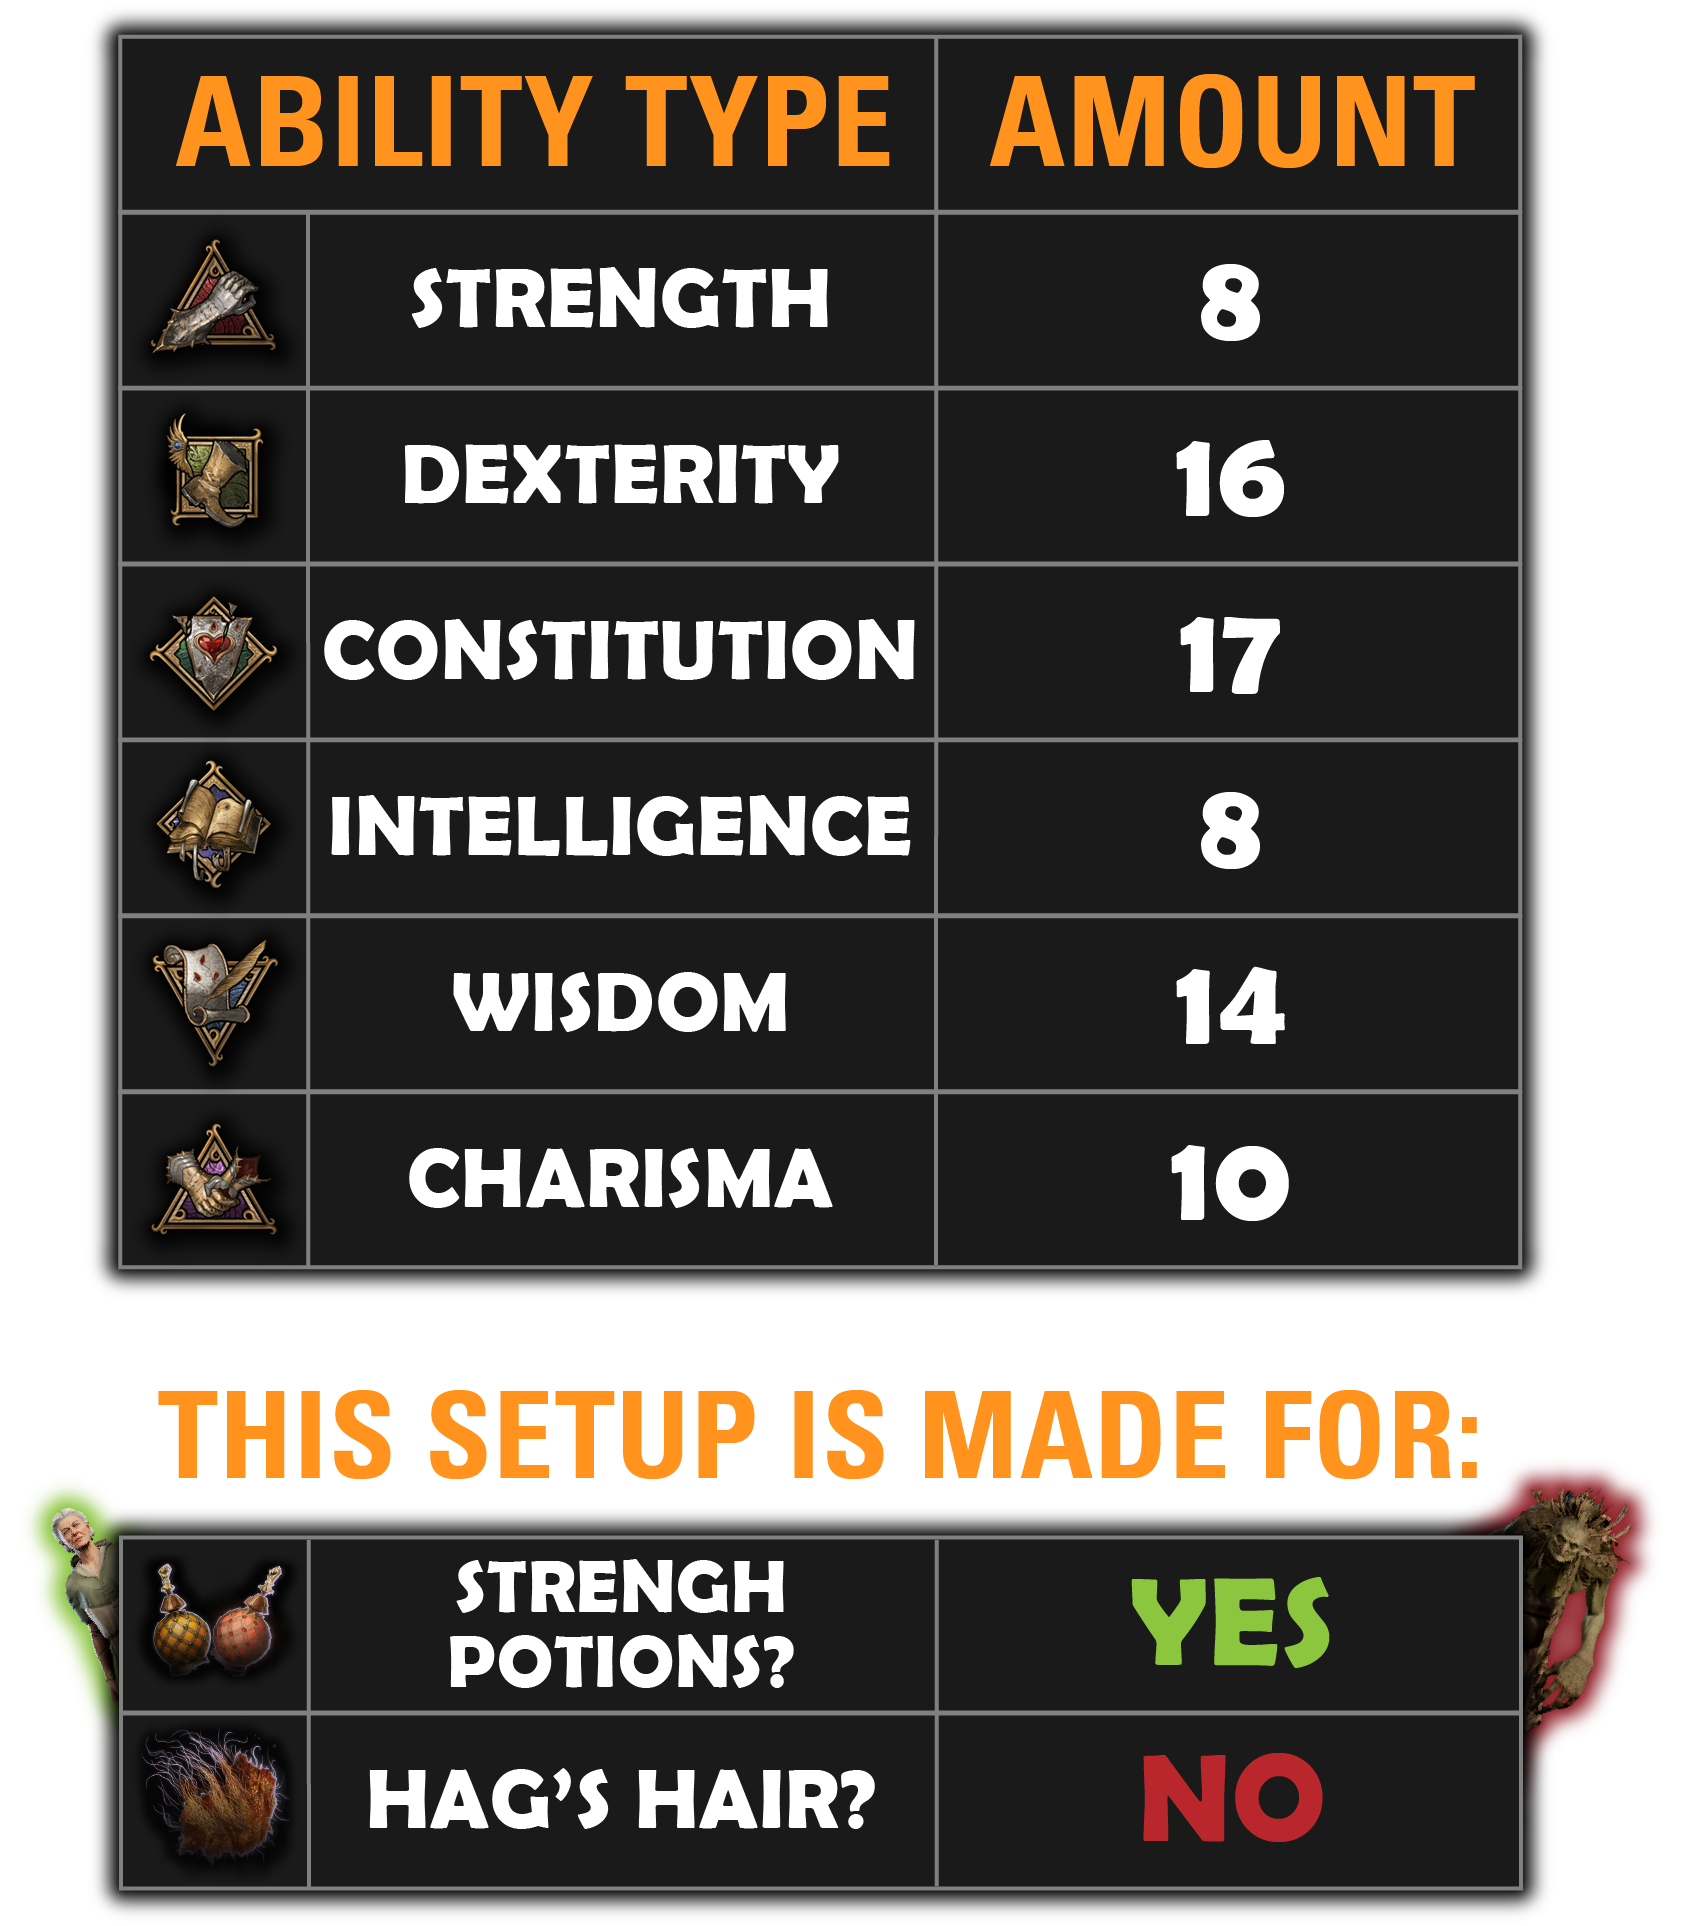
This setup dumps Strength and instead uses Hill/Cloud Giant Strength Potions. Tavern Brawler bonus goes to Constitution.

No Strength Potions. Tavern Brawler bonus goes to Strength.

LEVELing

No further choices to make here
KEY FEATURES
1st level: BARBARIAN

Unarmoured Defence
Bonus to your AC based on Constitution
Only works with Non-Armour gear equipped, so we will often not use any Light, Medium, Heavy Armor.

Rage
Starting off at Level 1, you can rage twice per long rest using a bonus action and it is only usable after combat has begun. While active, you gain:
Resistance against Piercing, Slashing, and Bludgeoning damage
2 extra damage on melee and throwing damage
Advantage on strength checks and saving throws

No further choices to make here
KEY FEATURES
2nd level: BARBARIAN

Reckless Attack
Perform your weapon attack with advantage and also gain advantage on all of your attack rolls until your next turn
The drawback is that enemies will also have advantage on attack rolls against you
If you are worried about providing enemies with advantage, you can attack with a normal attack and only use this as a reaction in case of a miss
I typically prefer to just manually cast this, as advantage provides a better chance to land a critical hit
REALLY strong ability to have early to more reliably land hits

1st choice to make here!
KEY FEATURES
3rd level: BARBARIAN
Choose a Subclass:
Berserker
This subclass synergizes really well with throwing - We can now throw with our bonus action while raging!

Frenzy
This replaces your rage, keeping the original properties but adding in some new effects:

Enraged Throw
Throw items or creatures with your bonus action, possibly knocking the target prone

Frenzied Strike
Make a melee attack with your weapon using a bonus action
Causes a stacking -1 penalty to your attack rolls until your rage ends
I don’t find myself using this often when focusing on throwing items
Generally more suited for a melee focused Barbarian

1st Feat to choose here!
KEY FEATURES
4th level: BARBARIAN

Choose a Feat:
Tavern Brawler
Barbarian is already solid in Levels 1 thru 3, but this is the point when it really starts going crazy!
Your Strength Modifier will now be added TWICE to your damage AND attack rolls for unarmed and throwing attacks.
Not only does this add a ton of damage, but you’ll almost never miss your thrown attacks now!
If your ability scores are set for Strength potions, take your Constitution from 17 to 18 here.
If not, take your Strength from 17 to 18 here.

No further choices to make here
KEY FEATURES
5th level: BARBARIAN

Extra Attack
You can make an additional free attack after making an unarmed or weapon attack
WORKS WITH THROWING
Really strong power spike here. You do miss out on that 2nd attack here if you don’t attack with your Standard Action.

Fast Movement
Increases movement speed by 3 meters as long as you are not wearing heavy armor

Why Rogue?
We aren’t really going to make use of Sneak Attack since that requires a finesse weapon, but at level 3 Rogue (level 8) we will get to pick a subclass that will greatly help us!
No further choices to make here
KEY FEATURES
6th level: rogue

No further choices to make here
KEY FEATURES
7th level: rogue


Cunning Action: Dash, Disengage, and Hide
Grants the ability to also use the following 3 actions as Bonus Actions:
Dash: Doubles your movement speed
Disengage: Moving won’t provoke Opportunity Attacks
Hide: Conceal your location (grants Advantage on attack rolls)

1st Rogue choice to make here!
KEY FEATURES
8th level: rogue
Choose a Subclass:
Thief
This subclass synergizes really well with our strong Bonus Action attacks

Fast Hands
You gain an extra Bonus Action
Can be used every turn to do an additional “Enraged Throw”

1st Fighter choice to make here!
KEY FEATURES
9th level: FIGHTER

Second Wind and Choose a Fighting Style
The heal isn’t very good, especially considering the potions we have access to at Level 9
The Fighting Styles also aren’t super beneficial for this setup
I’d probably go with Defence in case you end up using medium armor
Protection could work if you are using a shield, but it’s kind of meh

No further choices to make here
KEY FEATURES
10th level: FIGHTER

Action Surge
A great reason to go 2 levels into Fighter
Once per Short Rest you can use this and get an extra Action to use. This extra Action works with “Extra Attack” as well, giving us 2 additional Standard Attacks. This is a huge damage spike to open an encounter with or to get you out of a bind.

We have a choice to make here
KEY FEATURES
11th level: fighter
Choose a Subclass:
Champion
This subclass reduces the number you need to roll a Critical Hit by 1
Simple but effective
Eldritch Knight
This subclass gives us access to Weapon Bond and some basic spells
Weapon Bond is really nice if you want to throw a weapon that does not automatically return
However, many of the best throwing weapons already have the “returning” property
You could take your Fighter levels at 6 thru 8 in front of Rogue if you really want to rush to this to bind a throwing weapon that doesn’t have the “returning” property
For spells, really up to you and what might suit your party composition. I like Longstrider and Shield a lot

12th level: FIGHTER
We have a Feat to choose here
KEY FEATURES
Choose a Feat:
I’d recommend Ability Improvement, Alert, or Dual Wielder
2 points into Constitution with Ability Improvement will add extra hit points and also increase our Armor Class by 1 if making use of “Unarmoured Defence.”
If you are not using Strength potions, allocate these 2 points into Strength instead to hit 20.
Alert will give us immunity to being surprised and add +5 to our initiative rolls
This is really strong with the base game rules as it is only a 1d4 to roll initiative
With the 1d20 initiative mod, this falls off a lot
Dual Wielder can also be nice if you want to use a weapon in the off-hand instead of a shield
The weapon would be used for the stats it provides, not for attacking
alternate lvl 11 + 12: druid
Alternative path to Spore Druid
KEY FEATURES


2 Levels into Druid
With this route, you’ll scrap the upcoming 3rd and 4th Fighter levels at Levels 11 and 12
Choose whatever spells you like with Druid. The real reason we’ll take it is for access to the Circle of Spores subclass (Level 2 Druid / Level 12)
Circle of the Spores gives us Halo of Spores and Symbiotic Entity
Halo of Spores lets us use a Reaction to deal 1d4 Necrotic damage. I really like having this because you can drop a potion on the ground next to you without spending any resources then use this to pop open the potion. Essentially, it’s a way to use a potion without using one of your Bonus Actions. Really handy!
Symbiotic Entity gives us 4 temporary Hit Points per Druid level (8 temp HP at Level 2 Druid)
While this is active our attacks get an extra 1d6 Necrotic damage added to them and our Halo of Spores deals 2d4 Necrotic damage instead of 1d4.
Other sources of temporary hit points that are higher, like the 15 temp HP from Bonespike Garb, will override the 8 but you’ll keep your Symbiotic Entity active! This means you have more wiggle room to lose HP and keep the buff!
REALLY fun Subclass and extra flavor you can add onto the Barbarian here

EQUIPMENT
KEEP AN EYE OUT FOR THESE!

Gearing Philosophy
I will try and keep the guides spoiler free and not dependent on having specific gear for the build to work.
However, I will point out a few items that synergize specifically with this build. These aren’t required but definitely are nice to have!
I will shy away from listing most generic items that are generally good on all setups
The bg3.wiki is a great source for browsing through all the items
Act 1
Thrown attacks deal an 1d4 extra damage
Thrown and improvised weapon attacks deal an 1d4 extra damage
2-handed weapon / 1d10+1 Piercing / Automatically returns when thrown
On a hit with an unarmed attack, gain 2 Lightning Charges
Works with throwing as well!
Great backup if you miss out on the Kushigo gloves
Adds +2 to Dexterity (Increase to our AC and initiative)
Act 2

Would generally give to another teammate since our chance to hit is so high. But if no contenders for it, probably the best option due to advantage increasing our chance to critically strike

Same as Kushigo except 1d4 Fire instead of Physical
Adds +2 to Strength (Only use if NOT using Strength potions)

1-handed weapon / 1d6+1 Piercing + 1d4 Lightning
Similar to the Returning Pike in damage, but allows an off-hand or shield
Doesn’t automatically return unless you have Weapon Bond on it
Selune’s Spear of Night / Shar’s Spear of Evening
1-handed weapon / 1d6+3 Piercing
Similar to the Returning Pike in damage, but allows an off-hand or shield
Doesn’t automatically return unless you have Weapon Bond on it
Each version has some cool secondary bonuses that can be strong
Act 3
1-handed weapon / 1d8+3 Bludgeoning / Automatically returns when thrown
Deals an additional 1d8 Bludgeoning if the thrower is a Dwarf (disguising works!)
Deals an addition 2d8 Bludgeoning if the target is Large, Huge, or Gargantuan
Great for single target damage or if allies are nearby the target and you don’t want to hurt them with:
1-handed weapon / 1d6+3 Piercing / Automatically returns when thrown
Deals an additional 3d4 Thunder damage in a 6 meter AoE
This can hurt allies too, so I like to have another option on hand as well
Also grants 3 meters of extra movement speed and immunity to fall damage
My favorite throwing weapon!
Grants you 15 temporary hit points when you Rage
Reduce all incoming damage by 2
Deal your Constitution modifier in Piercing damage to melee attackers
Adds 1d6 Fire damage to our attacks
These are great to provide vulnerability to Piercing damage, doubling that portion of our damage
However, I’d generally recommend a different party member wear them that is in melee range
Thanks for stopping by
Thanks to bg3.wiki as well for the great site and for some of the icons

If these guides have been helpful to you, please consider checking out my Patreon!
A lot of work goes into these and the support really helps a ton!